
How to Install Engineered Wood Flooring – WoodFlooringfitting Step By Step Guide
If you have decided to go with engineered wood floors for your home then you are one of the many London home owners who are using this type of flooring for their homes. After choosing your floor, learning how to install it maybe the next step to take. Our expert from woodflooringfitting prepared a guide on how to install engineered wood floors on your home.
Factory finished engineered hardwood is the fastest growing segment of the hardwood industry, and it is easy to see why. Engineered hardwood is real wood, it’s layers of hardwood join together to make it an even stronger floor, and the top layer is every bit as natural and beautiful as solid hardwood, plus, engineered hardwood are more stable than solid hardwood, and can even be installed in basements.

Installation methods of engineered hardwoods:
- Floating Method
- Glue Down
- Nail Down Method
Before beginning to the installation process, be sure to read all manufacturers install instructions carefully. Some of the most important things you can do to insure a successful flooring installation take place before you install your first plank.
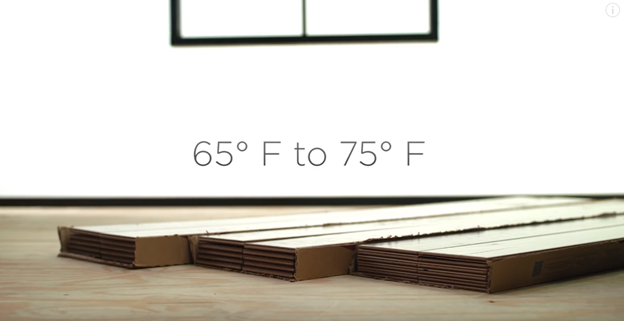
For any hardwood installation it is important to place the hardwood in the room where you will install it for at least 48 hours so the planks can acclimate to the home temperature and humility levels. Why? Your flooring will expand and contract, that’s natural, but if it doesn’t acclimate to the room the expansion and contraction can be so sever so it can buckle the entire floor. You need to maintain a temperature between 65 – 75 degree F, and relative humidity of 35-55% for a minimum of 5 days prior to the delivery of the floor. As well as during and after installation.
When the flooring arrives, open the ends of the cartons and leave them stacked no more than three cartons high in the room where the flooring will be installed. Another important part of your prep work is moisture testing. Moisture under your floor can be its worst enemy. Always test wood flooring for moisture content using a pen type moisture meter.
Then, you want to make sure that your sub-floor is clean, dry, and flat within 1/8 inch in any six foot section.
The materials and the tools you will need to install engineered wood flooring are as follow:
- A Tape Measure
- Painter’s Tape
- Hammer
- Moisture Meter
- Handheld Saw
- Electric Miter Saw
- Table Saw
- Pry Bar
- Safety Glasses
- Dusk Mask
- Tapping Block
- ½ inches spacers
- Transitions
- Moldings
- Drill
- Air Hose
- 15 Pound Roofing Felt
- Inline Air Regulator and Compressor
- Pneumatic Nailer
After the sub-floor has been cleaned and prepped, cover the sub-floor with 15 pound asphalt fill paper. The material will help keep the floor clean and prevent moisture from below. Once you have taken care of the sub-floor, it’s time to move on to planning your installation.
Preparation Work Overview:
- Read Instructions
- Acclimate planks
- Test for moisture
- Clean subfloor
- Level subfloor
- Install underlayment
- Undercut door frames
- Gather necessary tools
- Measure the subfloor
Installation Planning:
You want to pull planks from multiple boxes to achieve an even color variety across the floor. First, you need to decide on which direction to run the planks, ideally you should install the board’s perpendicular to the direction of your floor joist. Once you know the direction, you will decide your starting wall. Some home-owners find it easier to run planks parallel to an exterior wall because they are often straighter than interior walls.
Now, it is time to begin laying out the flooring, also called, racking the floor. Use random link planks from several different cartons. You want each row, to use a variety of links to avoid a pattern appearance. Make sure the grove side of each plank faces your starting wall. It is important to stand back and examine the board arrangement in good light to make sure the layout has the look you want before you begin installation.
A pro tip:
We are going to determine the size of our first and last rows. Why? Because the room will look more beautiful if the first and last row are equally sized. The sign of a new installer is a first row that is six inches wide and the last row is three.
Before you start your first row, measure the room. Divide by the width of the flooring planks you are installing. How many planks will it hold? Half of what remains will be the size of the first row, and the other half will be the size of the last. When cutting the first row you want to keep the side with the tongue, when cutting the last row, keep the grove side. Keep in mind that no row should never be less than 2 inches wide. Now that you have established the layout and figured the width of your first and last rows, you will need to fit the first two rows together as in the below image.
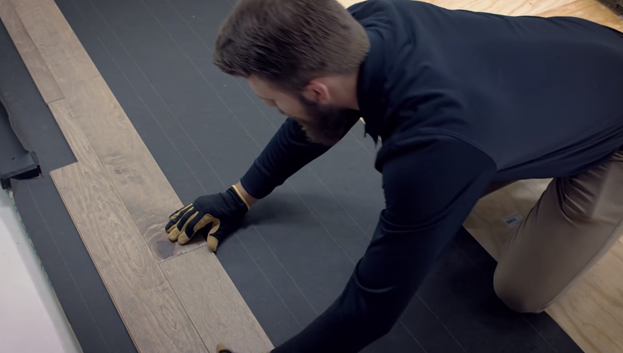
Start with the first plank in the right corner and connect the second plank at the end joint. Continue this process until you have reached the end of the first row. You probably need to cut the final plank to fit.
An important tip you need to know before you make your first cut: EXPANSION SPACE. You will need to maintain an expansion space of a half inch around the perimeter of the entire room, including walls, cabinets and other obstacles. You can use spacers to help maintain consistence on expansion space.
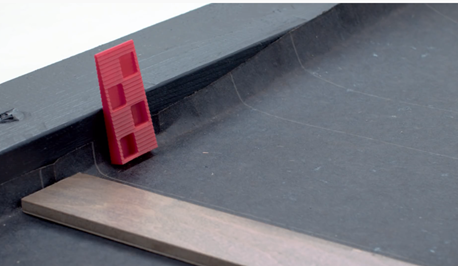
Why it is
necessary to use expansion space? Wood
is a natural product and it will expand and contract slightly with the changes
of temperature and humility. The expansion space will give your floor room to
expand and contract. At this point, you will have your first row in place.
Now, you will add the second row plank by plank, again from right to left. Connect the planks using the tongue of the
first row and the grove of the second row. Cut the link of the last plank as
needed. Keep doing the same until you have finished with all the rows.
Installations steps:
- Install first row along chalk line
- Secure tongue away from starter wall
- Drill holes in the face of the plank in the first row every 6 inches
- Face nail first row
- Use wood filler for nail holes
- Use a nailer/stapler
- Blind nail on the tongue of the plank every 3-4’’ on all rows
- Use tapping blocks as needed.
Final Touches of Installing your Engineered Wood Flooring
You can install the trim and moldings which are key to a beautifully finished floor. Quarter round covers the expansions gap around the perimeter of the room and gives room a polish look. In doorways less than 3-6 inches wide, you will need a transition peace.
After you have completed the installation, it will be time to take some rest and enjoy your installation of the engineered wood flooring from WoodFlooringFitting.co.uk. If the process looks delicate, then our team of installation and fitting can help you with the installation process.
[…] Engineered wood flooring is real wood, while laminate is made to look-like wood. Because of the name “Engineered” many people find it surprising that engineered wood is real wood, but that’s true. It is made of multiple layers of wood stacked together. The top layer, the part you see, is every bit as beautiful and natural as a piece of solid wood. The layers are joined together in a cross-grain construction. That means that each layer of hardwood is facing a different direction. Check our Engineered Wood Flooring Installation guide and learn more about Engineered Wood Floors. […]